Snap-button patch inspection is hard not because photographing one patch is hard, but because in a multi-piece-per-frame stream every flash, wrinkle, tear and soil has to be caught reliably — the two snaps set complete and square, the substrate undamaged: good ones not over-rejected, NG ones not let through.
This article is based on the real segmentation renders from the Qunyi Technology snap-button patch inspection, laid out as target → defect families → imaging & lighting → operator chain / judgment / parameter dictionary → live dashboard. The mask colour matches the field: orange marks the defect region (flash / tear / wrinkle), each labelled “defect”. UI screenshots are drawn to the product's real controls and wording.
The target: which faces of a patch matter
The target is an oval nonwoven patch with two metal snap buttons riveted on. The difficulty: the substrate is textured, matte, and the same colour as the defects — flash and tears are often the same material stacked or missing, hard to separate by grey threshold; plus the snaps reflect and many pieces enter the field together. The system uses semantic segmentation masks to carve the defect region out of the fabric — not just draw a box — so flash direction and a tear's hole shape become measurable.
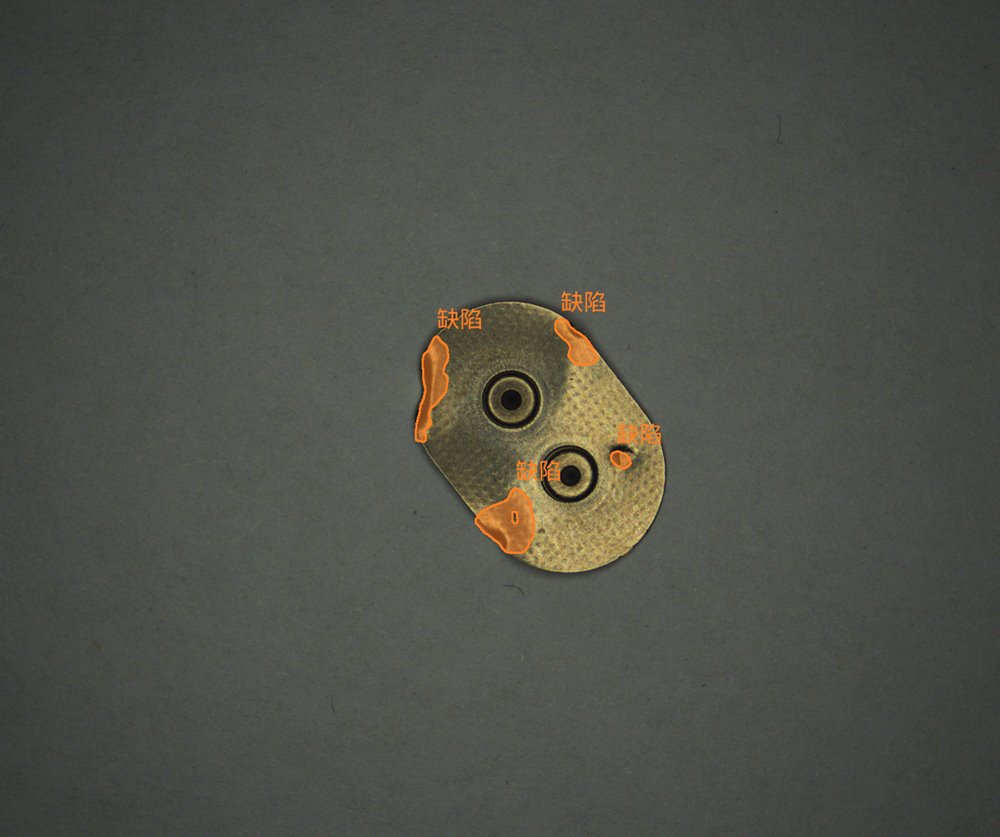
▲ Defect: one piece, several “defect” regions — orange outlines flash and tear
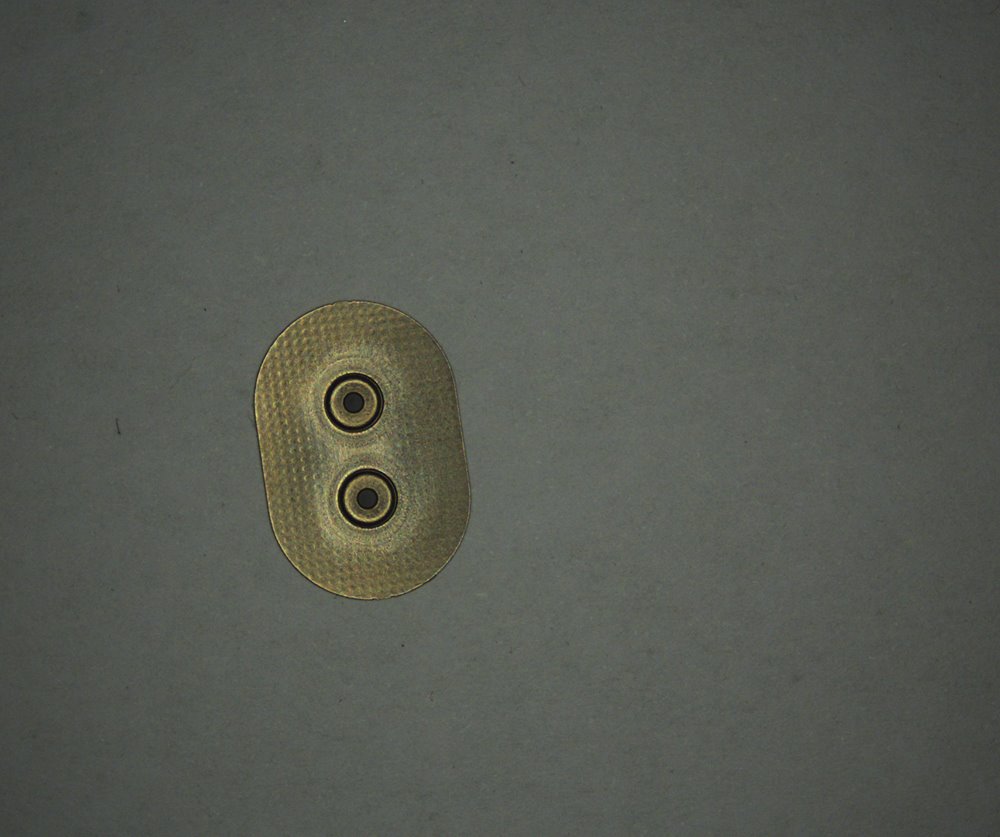
▲ Good: flat substrate, both snaps complete and square, no mask
Defect families: five NG classes to pull out
From field samples and segmentation results, patch appearance NGs fall into five families, each mapping one-to-one to the defect dictionary later:
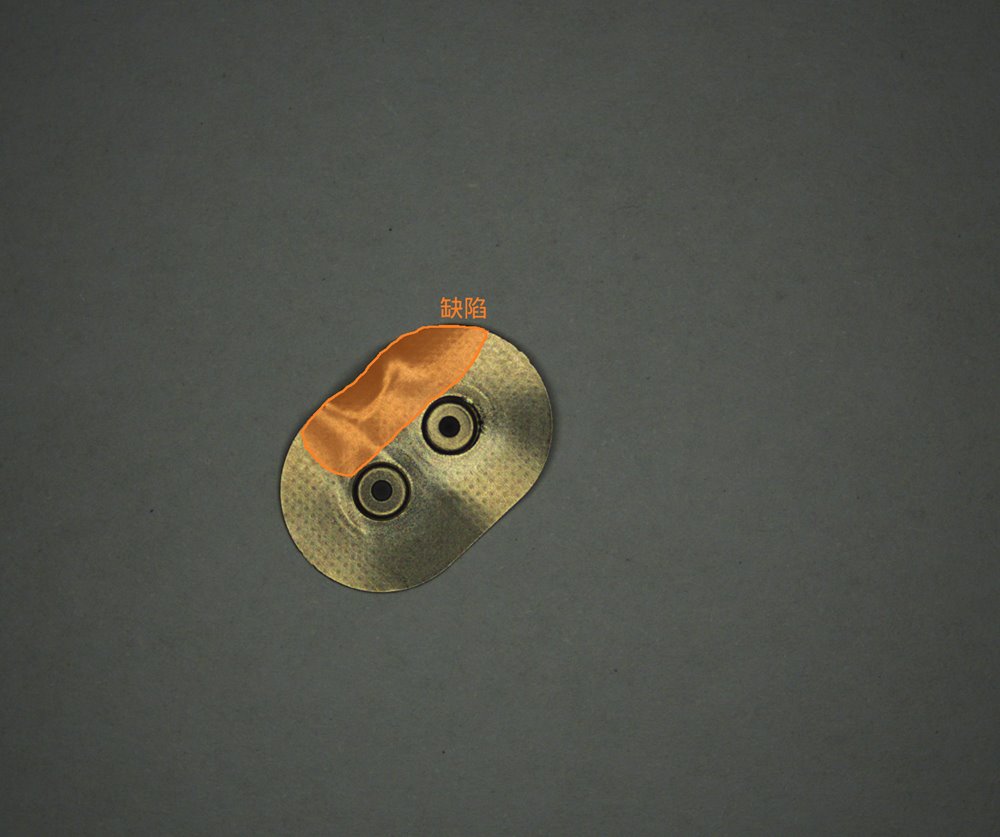
▲ D1 flash / burr: orange outlines substrate spilling over the edge
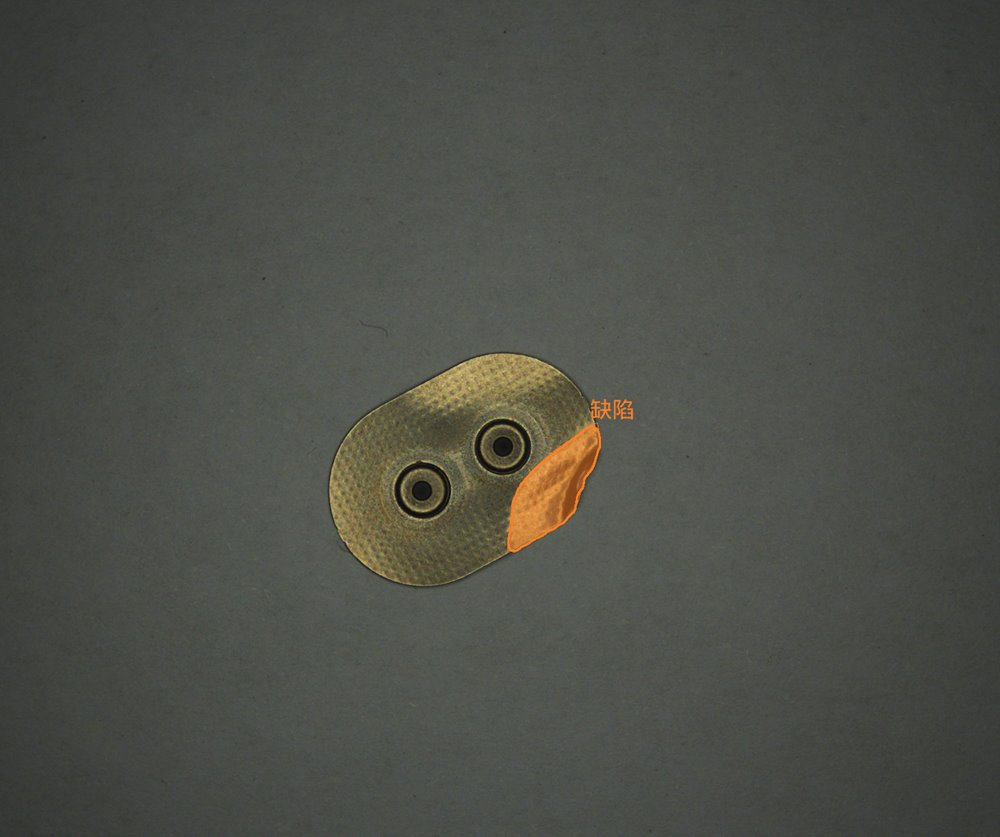
▲ D1 flash: a large overflow on the side, labelled “defect”
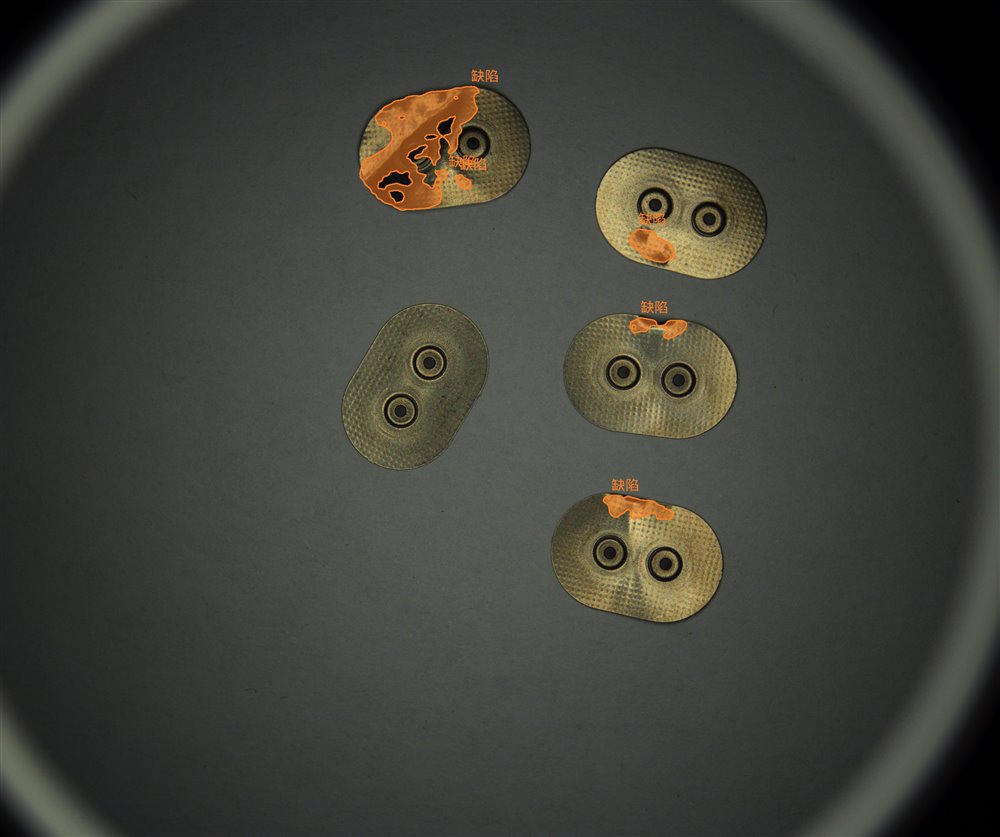
▲ D3 tear / hole: black holes visible inside the top-left piece's mask
Same-colour defects are hardest; multi-piece frames need per-piece counting
Flash and tears are often the same colour and weave as the substrate, so a plain threshold can't separate them; and a single frame often carries good and defective pieces together, so you must first isolate each piece, then segment defects per piece — otherwise good and bad get counted as one.
Imaging & lighting: ring diffuse + dark-field background
To separate a same-colour defect from the weave, light is key. The solution uses one imaging station:
▲ Multi-piece frame: good and defective pieces mixed in one field
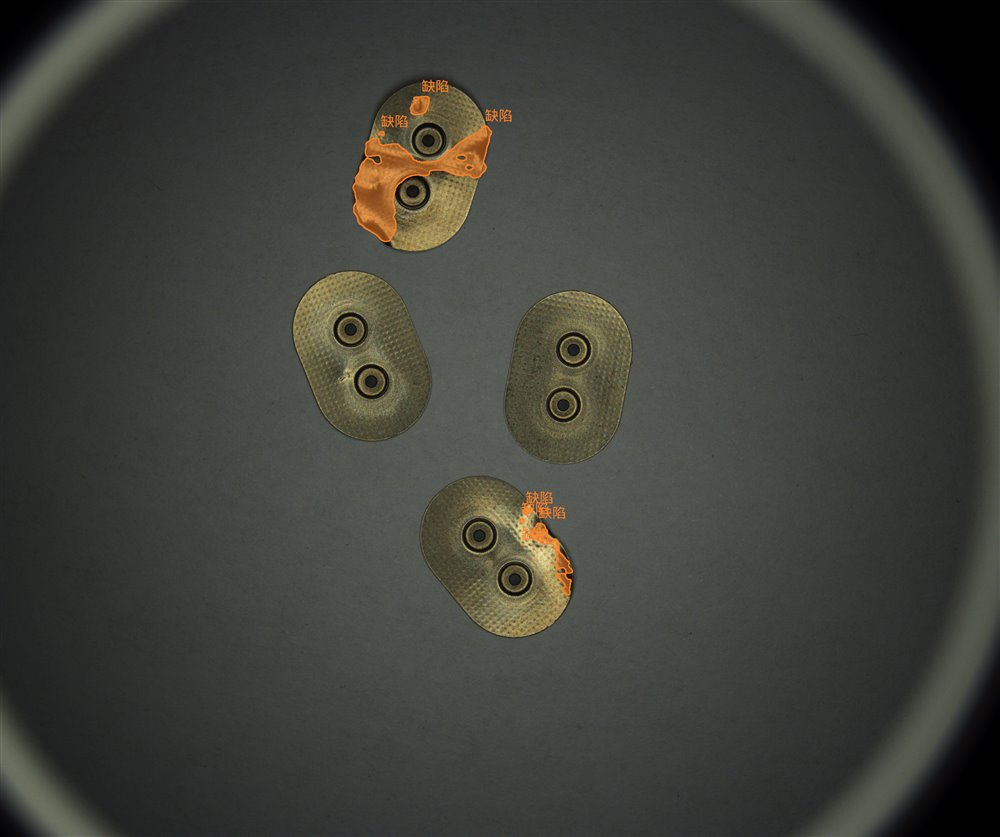
▲ Multi-piece frame: most good, a few labelled “defect”
Workflow: multi-object + few-shot segmentation chain
Create the project “Snap-button patch inspection”, drag operators from the left library and connect them (matching the real canvas):
▲ Tensor-flow canvas: camera → preprocess → multi-piece localise → few-shot segmentation → grading (real UI style)
Judgment: turning masks into defect events
Open the “GPU event orchestrator”; the top reads “Configuring defect: flash / burr”. Drag in the primitive “region area > threshold”:
- The defect list on the right: D1 flash/burr, D2 wrinkle/lift, D3 tear/hole, D4 soil/discolour, D5 snap missing/off-position… unconfigured ones read “pending”;
- Tears use a “holes-in-mask count / area” primitive; snap faults use an “object presence + position constraint” primitive, checking both snaps' presence and spacing;
- Each class binds an area / count / position threshold; crossing it fires the matching NG and drives the sort.
▲ GPU event orchestrator: configuring “flash / burr” = primitive “region area > threshold” (real UI style)
Camera & page parameters
Open “Parameters” and switch to the page parameters tab. The left “defect statistics” align with the defect families for per-batch NG reporting:
- Columns: defect type (NG0…NG4), defect name (flash/burr, wrinkle/lift, tear/hole, soil/discolour, snap fault), count;
- “Add / remove defect type” is supported; edit name and threshold on the right, click “Save parameters” to apply;
- Result display: mask overlay on, defect name on, font size 40, line width 2 — matching the field mask look;
- On the camera side, the “Industrial camera” node configures channel, exposure and ROI so a multi-piece frame is fully framed.
| Type | Defect name | Count |
|---|---|---|
| NG0 | Flash / burr | 4 |
| NG1 | Wrinkle / lift | 1 |
| NG2 | Tear / hole | 2 |
| NG3 | Soil / discolour | 1 |
| NG4 | Snap fault | 0 |
▲ Parameters · page params: defect dictionary and display settings (real UI style)
Live run: per-piece grading of a multi-piece frame
- Left: live view + segmentation mask, each piece in the frame isolated and defect-labelled;
- Right: a five-class defect checklist — flash/burr, wrinkle/lift, tear/hole, soil/discolour, snap fault; hits marked red;
- Verdict: any piece, any class over threshold → NG, counted by class and sort driven; only a full miss lets a piece pass.
▲ Live monitor: multi-piece live segmentation on the left, five-class verdict on the right
Comparison table & takeaways
| Aspect | Manual sorting / traditional AOI | VisionAgent snap-patch inspection |
|---|---|---|
| Defects | Visual check under lamp, same-colour defects missed | Few-shot segmentation outlines flash / tear / wrinkle live |
| Multi-piece | Good vs bad told apart by eye in one frame | Localise per piece first, then segment & grade each |
| Standard | By the master's experience, person to person | Area / hole / position thresholds grade uniformly |
| Changeover | Traditional AOI retunes per class | Just add a few samples; thresholds decouple from perception |
| Records | Paper spot-checks filled in later | Per-piece result and defect type auto-logged into reports |
- Business need: pull out flash, wrinkle, tear and soil per piece, snaps complete and square, without over-rejecting good ones;
- Decision rule: take the strictest across defects per piece; any class over threshold is NG and counted;
- Software setup: five-operator tensor flow + GPU event orchestration (defect primitives) + page parameters (NG dictionary).
Four questions run throughout: what the system looks at, what counts as good, when to reject, and how results reach the report.
Closing note
Snap-button patch inspection is hard not because of photographing one patch, but because of chaining capture → multi-piece localisation → few-shot segmentation → defect metrics → grading & sort → batch logging into a link the floor is willing to use and quality can re-audit.